November 20, 2024
How to Integrate Stripe Payment in Next.js 15: Step-by-Step Guide
Learn how to integrate Stripe payments in your Next.js 15 application with this step-by-step guide. Perfect for SaaS and digital products.

If you're short on time, you can find the full code on GitHub.
Introduction
For a long time, I thought managing payments was scary. It's one of the most critical parts of an app that you really don't want to mess up. But nowadays, it's much simpler. In this tutorial, we'll use Stripe to set up payments in Next.js 15 with the app router.
Here's what we'll cover:
- How to create a Stripe product and price
- How to create a payment button in your Next.js app
- How to set up a webhook to handle Stripe events and trigger actions in your Next.js app
By the end of this guide, you'll have a working payment integration ready to go.
Explanation of the Payment Workflow
Here's how the payment process works step by step:
- The user clicks on the Pay button in your app.
- Your app creates a Stripe Checkout session.
- The user is redirected to the Stripe-hosted checkout page.
- The user completes the payment.
- Stripe triggers specific events once the payment is processed.
- Your app listens for these events through a webhook and executes code based on the event type. In this guide, we'll keep it simple and just display a message after payment.
Here's a visual representation of the workflow:
Step 1: Create Your Next.js Project
The first step is to set up a new Next.js 15 project. Open your terminal and run the following command:
npx create-next-app@latestYou'll be prompted to enter a name for your project. Type in a name, and for the rest of the prompts, you can simply press Enter to select the default options.

That's it! You now have a fresh Next.js project ready to go.
Step 2: Create a Price ID in Stripe Dashboard
Now, we'll set up a product and get its Price ID from Stripe. Follow these steps:
- Log in to your Stripe dashboard and toggle Test Mode in the top bar. This helps you avoid making mistakes while experimenting.
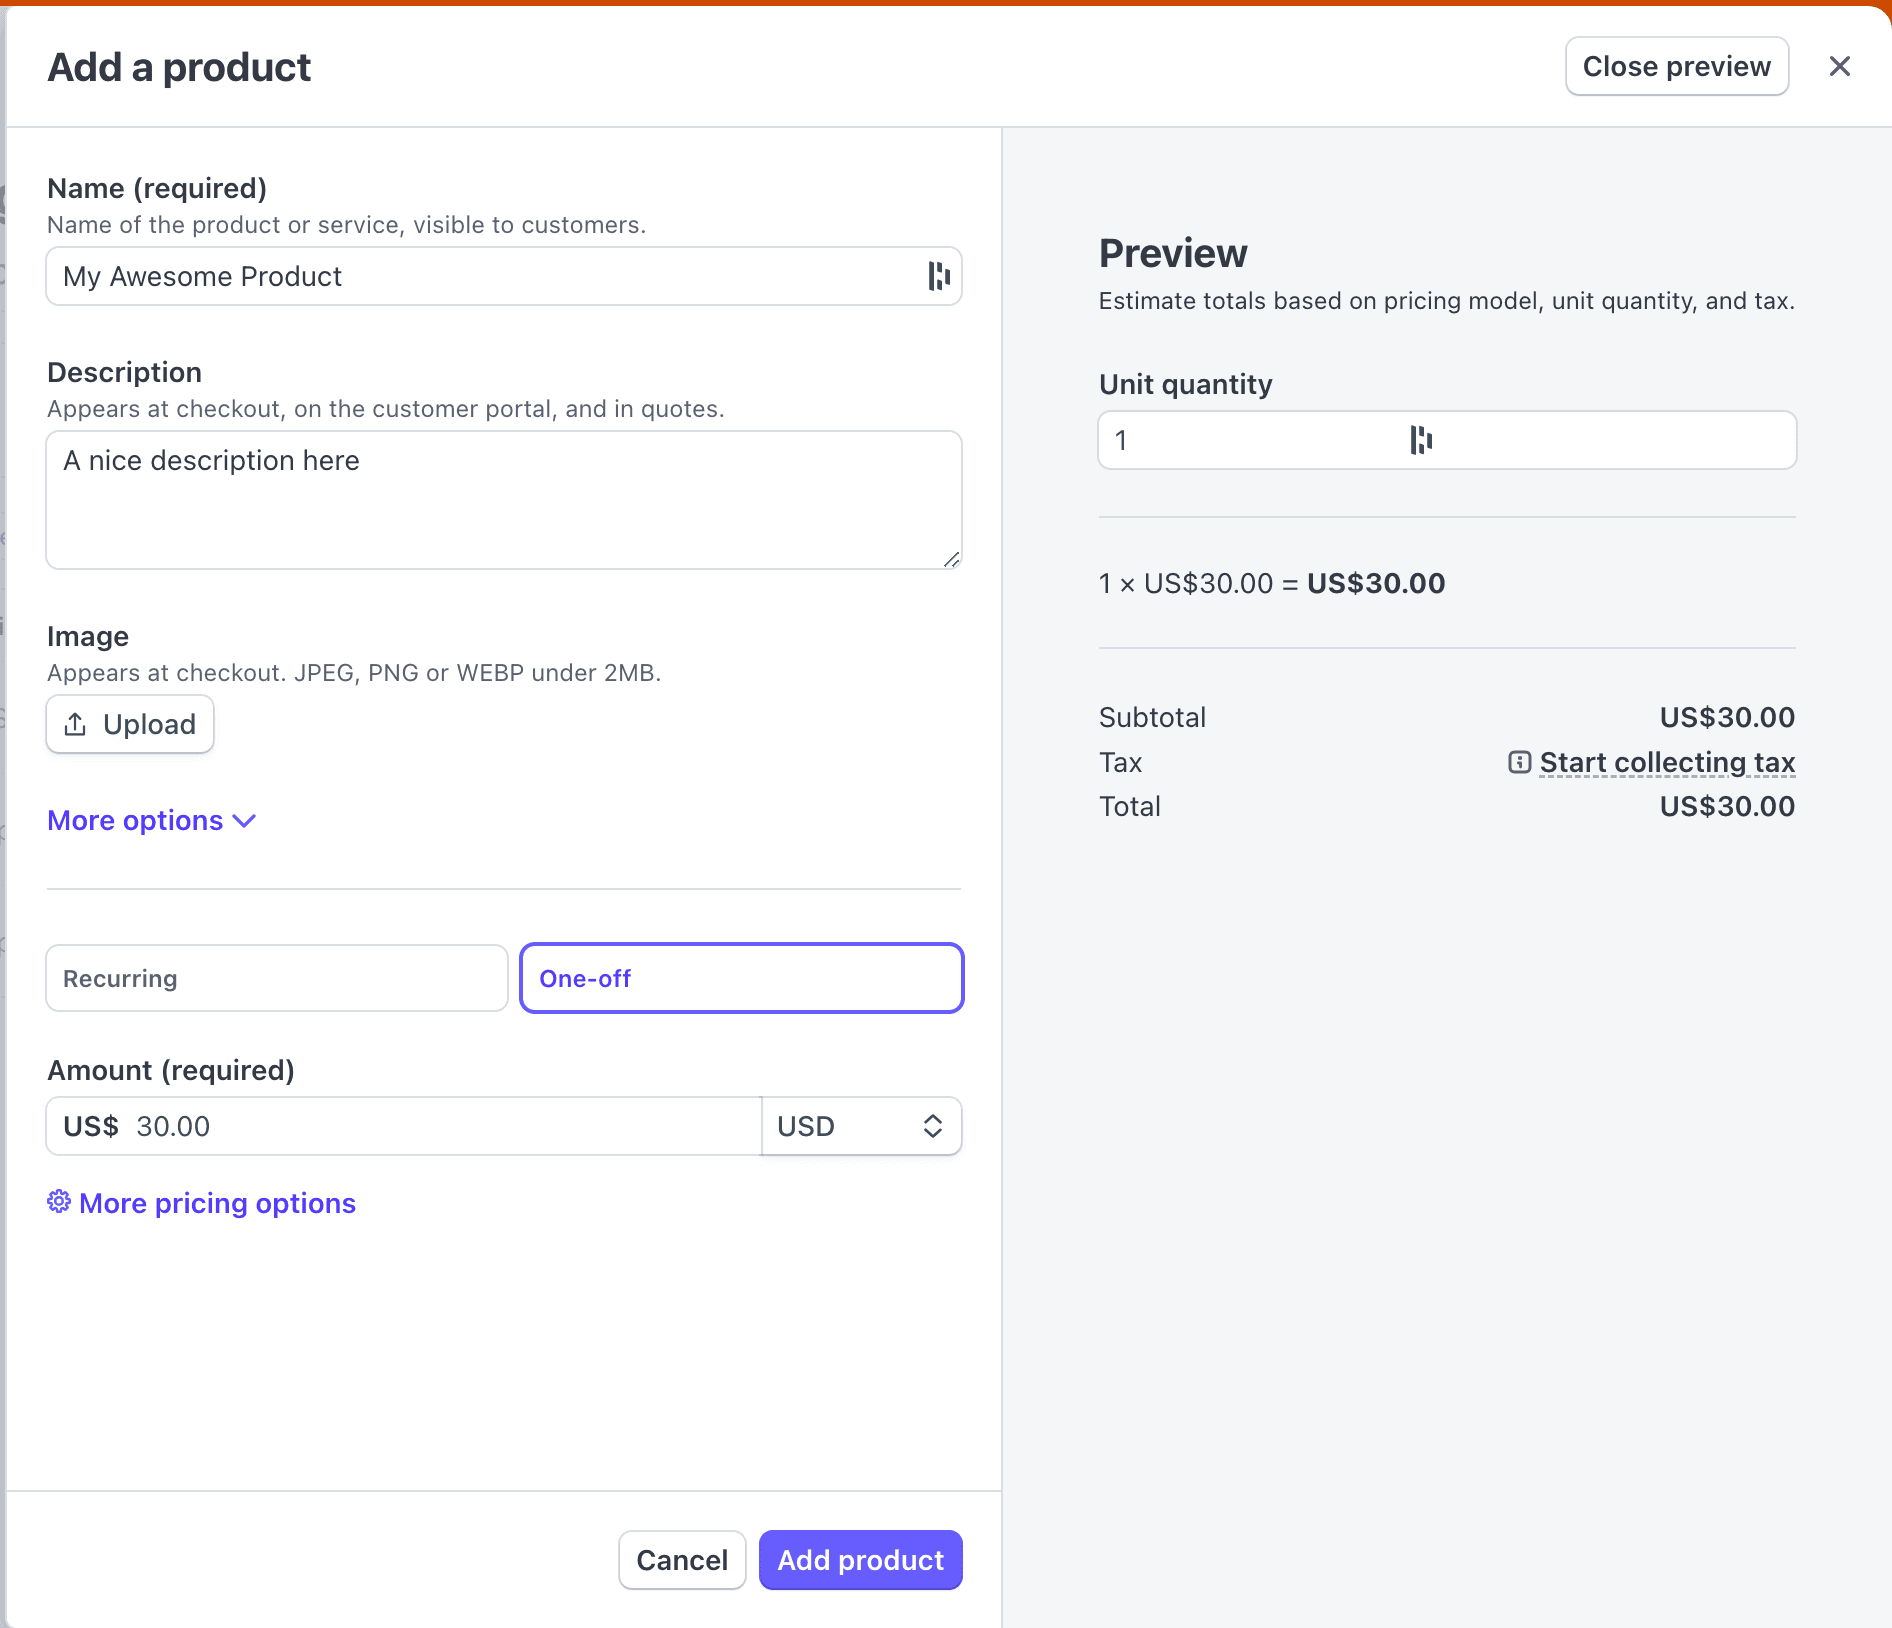
- In the left sidebar, click Product Catalogue and then click Create Product.
- Fill out the form with the details of your product. For this tutorial, we'll use a one-time payment option as an example.

- Click Add Product. Your product will now appear in the list.
- Select your product from the list.
- In the Pricing section, click on the price to open the price details page.
- On the price details page, look for the Price ID in the top-right corner and click to copy it.
You'll need this Price ID in the next step, so keep it handy.
Step 3: Set Up Stripe in Next.js
With your product and Price ID ready, let's integrate Stripe into your Next.js project.
First, navigate back to your project directory. Install the necessary dependencies for using Stripe's API by running:
pnpm add stripe @stripe/stripe-jsNext, create a .env.local file in the root of your project to store environment variables. Add the following variables:
BASE_URL=http://localhost:3000STRIPE_PRICE_ID=NEXT_PUBLIC_STRIPE_PUBLIC_KEY=STRIPE_SECRET_KEY=- BASE_URL: Your development URL, which will be useful later.
- STRIPE_PRICE_ID: Paste the Price ID you copied in the previous step.
- NEXT_PUBLIC_STRIPE_PUBLIC_KEY and STRIPE_SECRET_KEY: To get these keys, go back to your Stripe dashboard (still in Test Mode).
- Click Developers in the top bar and select the API Keys tab.
- Copy the Publishable Key and paste it into
NEXT_PUBLIC_STRIPE_PUBLIC_KEY. It should look likepk_test_xxxxx. - Click Reveal Secret Key to view your secret key. Copy it and paste it into
STRIPE_SECRET_KEY. It should look likesk_test_xxxxx.
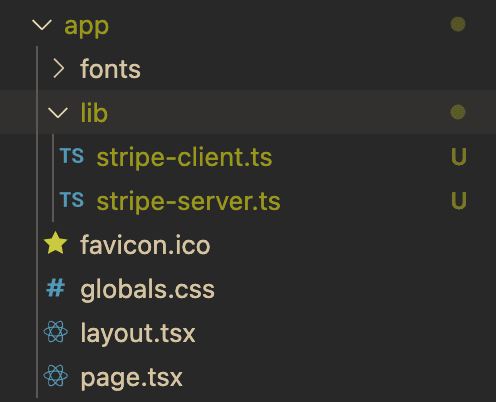
Now, set up Stripe in your code. In your app directory, create a lib folder. Inside, create two files: stripe-server.ts and stripe-client.ts.
In stripe-server.ts, add the following code:
import Stripe from "stripe";export const stripeApi = new Stripe(process.env.STRIPE_SECRET_KEY!);This initializes the Stripe API on the server side, allowing you to interact with it in your application.
In stripe-client.ts, add:
import { loadStripe, Stripe } from "@stripe/stripe-js";let stripePromise: Promise<Stripe | null>;export const getStripe = () => { if (!process.env.NEXT_PUBLIC_STRIPE_PUBLIC_KEY) { throw new Error("Missing Stripe Public Key"); } if (!stripePromise) { stripePromise = loadStripe( process.env.NEXT_PUBLIC_STRIPE_PUBLIC_KEY as string, ); } return stripePromise;};This initializes the Stripe library on the client side. The getStripe function ensures that only one instance of the client library is created.
Launch your SaaS without giving up your evenings
At this point, your project should have the necessary setup to start using Stripe. Your folder structure should look something like this:

Step 4: Create the Purchase Button
Now let's add a purchase button to your app that initializes a Stripe Checkout session.
Create a Server Action
Start by creating a components folder in your app directory. Inside, create a purchase-button folder. In this folder, create a purchase.ts file and add the following code:
"use server";import { stripeApi } from "@/app/lib/stripe-server";export default async function purchase() { try { const priceId = process.env.STRIPE_PRICE_ID; const stripeCheckoutSession = await stripeApi.checkout.sessions.create({ payment_method_types: ["card"], line_items: [ { price: priceId, quantity: 1, }, ], mode: "payment", success_url: `${process.env.BASE_URL}/?checkout=success`, cancel_url: `${process.env.BASE_URL}/?checkout=cancelled`, metadata: { // Add any metadata you'd like to store for this session }, }); return { checkoutSessionId: stripeCheckoutSession.id }; } catch (e) { console.error(e); return { checkoutSessionId: null }; }}What's happening here?
- The
purchasefunction is a server action (indicated by"use server"at the top). Server actions run securely on the server. - The function creates a Stripe Checkout session using the
stripeApiinstance and the price ID from your environment variables. - It sets up options like
payment_method_types(in this case, card payments) and defines themodeaspaymentfor a one-time payment. - The
success_urlandcancel_urldefine where the user is redirected after completing or canceling the payment. - Finally, the function returns the
checkoutSessionId. If something goes wrong, it logs the error and returnsnull.
Create the Frontend Button
Now, let's add the frontend logic. In the same purchase-button folder, create a purchase-button.tsx file and add the following code:
"use client";import { getStripe } from "@/app/lib/stripe-client";import { useState } from "react";import purchase from "./purchase";export const PurchaseButton = () => { const [isLoading, setIsLoading] = useState(false); const onSubmit = async () => { setIsLoading(true); const res = await purchase(); if (!res.checkoutSessionId) { console.error("Failed to create Stripe Checkout session."); setIsLoading(false); return; } const stripe = await getStripe(); await stripe?.redirectToCheckout({ sessionId: res.checkoutSessionId, }); setIsLoading(false); }; return ( <button onClick={onSubmit} disabled={isLoading} className="bg-blue-500 px-4 py-2 text-white" > {isLoading ? "Loading..." : "Purchase"} </button> );};What's happening here?
- This is a simple React component that displays a button.
- When the button is clicked, the
onSubmitfunction calls thepurchaseserver action to create a Stripe Checkout session. - If the session is created successfully, the user is redirected to the Stripe Checkout page using the Stripe client library.
- A loading state ensures the button is disabled while the process is running, giving users clear feedback.
Add the Button to the Homepage
Now, let's test the button. Replace everything in your homepage with the following code:
import { PurchaseButton } from "./components/purchase-button/purchase-button";export default async function Home({ searchParams,}: { searchParams: Promise<{ [key: string]: string | string[] | undefined }>;}) { const { checkout } = await searchParams; return ( <main className="flex h-screen w-screen items-center justify-center"> <div className="space-y-4"> {checkout === "success" ? ( <p className="text-green-500">Payment successful!</p> ) : ( <p className="text-red-500">Payment cancelled.</p> )} <PurchaseButton /> </div> </main> );}Here, we simply add the PurchaseButton component to the homepage and display a message to inform the user whether the checkout was successful or cancelled.
Now, start your development server:
pnpm devNavigate to http://localhost:3000. You should see your button. Click on it to test the flow:
- You'll be redirected to the Stripe Checkout page.
- Enter the following test payment details:
- Card number:
4242 4242 4242 4242 - Expiry date:
12/34 - CVC:
567 - The cardholder name can be anything.
- Card number:
- Complete the payment.
Once the payment is successful, you'll be redirected to your homepage with ?checkout=success added to the URL, and you should see the success message.
If you cancel, the URL will show ?checkout=cancelled.
Step 5: Create the Webhook to Handle Actions After Purchase
Great, your users can now pay you—that's already a big step forward! But in most real-world applications, like a SaaS, you'll need to perform actions after a purchase, such as updating a user's subscription status or recording the payment in your database. This is where webhooks come in.
A webhook is essentially an API endpoint that Stripe calls when specific events occur, like a payment being completed. Let's set one up.
Simulate Webhooks Locally with Stripe CLI
To test webhooks locally, we'll use Stripe CLI. Follow these steps to set it up:
-
Install Stripe CLI. For macOS users, you can install it using Homebrew:
brew install stripe/stripe-cli/stripeFor other installation methods, check Stripe's documentation.
-
Log in to your Stripe account using the CLI:
stripe login -
Start the webhook listener:
stripe listen --forward-to localhost:3000/api/webhooks/checkoutThis command creates a listener that forwards Stripe events to your local API. When it starts, it will provide a Webhook Secret, which looks like
whsec_xxxxx. Copy this secret and add it to your.env.localfile asSTRIPE_WEBHOOK_SIGNING_SECRET.
Note: Keep the terminal with this command running, as closing it will stop the listener.
Implement the API Route
Now, let's create the webhook API route in your Next.js app:
- In your
appdirectory, create a new folder structure:api/webhooks/checkout. - Inside the
checkoutfolder, create aroute.tsfile. - Add the following code:
import { NextRequest } from "next/server";import { default as stripe, default as Stripe } from "stripe";export async function POST(request: NextRequest) { const body = await request.text(); const headers = await request.headers; if (!process.env.STRIPE_WEBHOOK_SIGNING_SECRET) { return new Response("Missing stripe webhook signing secret", { status: 500, }); } const webhookSigningSecret = process.env.STRIPE_WEBHOOK_SIGNING_SECRET!; const stripeSignature = headers.get("stripe-signature"); if (!stripeSignature) { return new Response("Missing stripe signature", { status: 400 }); } let event: Stripe.Event; try { event = stripe.webhooks.constructEvent( body, stripeSignature, webhookSigningSecret, ); } catch (err) { console.error("Webhook signature verification failed:", err); return new Response( `Webhook Error: ${err instanceof Error ? err.message : "Unknown error"}`, { status: 400, }, ); } if (event.type !== "checkout.session.completed") { return new Response(`Unhandled event type: ${event.type}`, { status: 400 }); } const checkoutSession = event.data.object as Stripe.Checkout.Session; try { const userId = checkoutSession.metadata?.userId; const userEmail = checkoutSession.customer_details?.email; // Perform any required actions, such as updating the database // For instance: // await prisma.user.update({ // where: { id: userId }, // data: { subscriptionStatus: "ACTIVE" }, // }); console.log(`Payment processed for user ${userId} (${userEmail})`); return new Response("Payment processed successfully", { status: 200 }); } catch (error) { console.error("Payment processing failed:", error); return new Response("Internal server error", { status: 500 }); }}What's Happening Here?
- Signature Validation
- The webhook extracts the raw request body and headers.
- It uses the
stripe-signatureheader and Stripe's SDK to validate the webhook's authenticity. If the signature is invalid or missing, an error is returned.
- Event Handling
- We filter for
checkout.session.completedevents, which are triggered when a payment is successfully completed. - You can add more event types here if needed.
- We filter for
- Database Update (or Other Actions)
- You can extract user-specific data, such as the
userIdoremail, from theCheckout.Sessionobject. - Use this data to perform actions, like activating a user's subscription or logging the payment.
- You can extract user-specific data, such as the
- Response
- The webhook logs the processed event and returns an appropriate response.
Test Your Webhook
Make sure your Stripe webhook listener is still running. Then, go back to your homepage and click the purchase button.
- Enter the test payment details:
- Card number:
4242 4242 4242 4242 - Expiry date:
12/34 - CVC:
567
- Card number:
- Complete the payment.
Check your terminal for the webhook listener. You should see a log indicating that the payment was processed, along with details about the user.

And that's it! You now have a functioning webhook to handle Stripe events in your Next.js app.
Going into Production
Now that your Stripe integration is working in development, it's time to prepare for production. This involves updating your environment variables and setting up a webhook for your live environment.
Set Up Environment Variables
To switch to production, follow these steps:
- Update Your
BASE_URL- Replace your development URL in
BASE_URLwith your production URL, e.g.,https://yourdomain.com.
- Replace your development URL in
- Switch to Live Mode in Stripe
- Log in to your Stripe dashboard and toggle off Test Mode in the top bar.
- Create a New Product
- In the Product Catalogue, create a new product and price just like you did for testing.
- Copy the new Price ID and update the
STRIPE_PRICE_IDin your environment variables.
- Update the API Keys
- Go to the Developers section in the Stripe dashboard and open the API Keys tab.
- Copy the Publishable Key (it should look like
pk_live_xxxx) and paste it intoNEXT_PUBLIC_STRIPE_PUBLIC_KEY. - Create a new Secret Key:
- Select "Building your own integration" and click "Create Secret Key".
- Give the key a name, then copy it (it should look like
sk_live_xxxx) and paste it intoSTRIPE_SECRET_KEY.
Your .env file should now look something like this:
BASE_URL=https://yourdomain.comSTRIPE_PRICE_ID=price_live_xxxxNEXT_PUBLIC_STRIPE_PUBLIC_KEY=pk_live_xxxxSTRIPE_SECRET_KEY=sk_live_xxxxCreate the Webhook for Production
To handle Stripe events in production, you'll need to set up a live webhook:
- Add a New Webhook Endpoint
- In your Stripe dashboard, go to the Developers section and select the Event Destinations tab.
- Click Add Endpoint.
- Configure the Endpoint
- Enter the URL of your live webhook endpoint, e.g.,
https://yourdomain.com/api/webhooks/checkout. - Select the events to listen to. For this guide, choose checkout.session.completed.
- If your app needs to handle additional events, you can select them here.
- Enter the URL of your live webhook endpoint, e.g.,
- Save and Copy the Webhook Secret
- Once the endpoint is created, it will appear in the list.
- Click Reveal under the Signing Secret column to view your Webhook Secret (it should look like
whsec_xxxxx). - Add this secret to your production environment variables as
STRIPE_WEBHOOK_SIGNING_SECRET.
Final Steps
Deploy your Next.js app to your production environment and ensure all your environment variables are set. With these updates, your app is ready to handle live payments and webhook events.
Conclusion
That's it! You now have everything you need to accept payments in your Next.js 15 application using Stripe. With this setup, you can confidently build your SaaS or any other product that requires payment integration.